|
||||||||||||||||||||||||||||||||||||
|
Scope Install on Air Rifles
FORWARD Why did I write this? I recently did a scope installation on my Daisy 880 air rifle, and found much to know and yet little in the directions that came with the scope and little info on the net that had the whole story. So I am doing this in case it might help someone. The first part of this is about install. If you want some simple advice on scopes, or adjusting them after installation, or what you are adjusting for (gravity) I will cover some of that near the end. |
||||||||||||||||||||||||||||||||||||
 |
||||||||||||||||||||||||||||||||||||
|
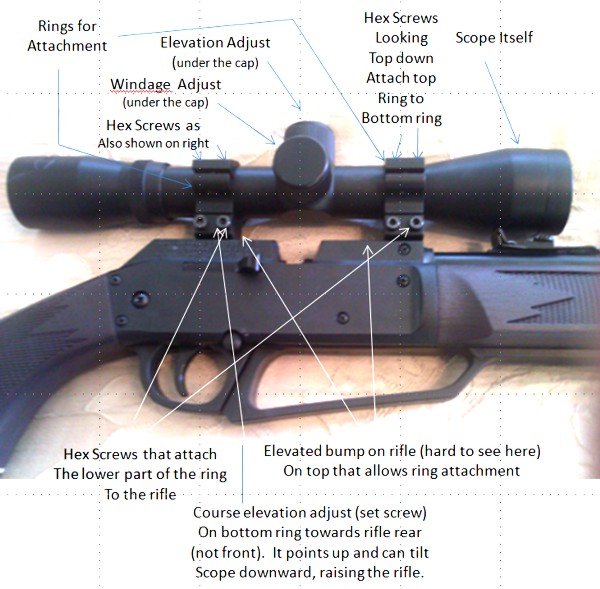
INSPECTION First of all, look at the scope you bought and also your rifle to identify parts. If new at this, like I was, you might be looking on your rifle for some complex scope mounting area. There are no complex ones, but there often is a very simple one. On the top side of the rifle like the see above, the highest piece above that trigger area and pump area is a long but narrow upper area where the scope attaches. No screw holes. But you might notice on some that the material on top is slightly wider than the material right below it - sort of like a pagoda - a roof overhanging and indented area - allowing something to go beneath it to grab. On my air rifle, this attach area is plastic. On some more expensive rifles this bump for scope installation I noticed was metal. Notice also that your scope should come with rings for attachment. Those rings have a means of taking them apart - likely hex screws that you use an Allen wrench for that may be supplied with your scope. Looking at the very top of the scope you should see hex screws going downward - those attach the upper ring on each side to the lower ring on each side. Those will have to come apart and best to do that now. Ensure you save the screws since you will put them back in when done. But first of all, since the scope is delicate, we will leave the scope out of the installation till we are near the end. We only need to work with the bottom rings at first and then those bottom rings and the rifle - while the scope itself sits safely a bit away from all of this. Before attaching the bottom half of each ring to the rifle, examine each ring first. One of them (like mine) may have a set screw in the center that you normally would never see - since the scope would be sitting on it. If you have one of those, and I did, it is a very course (rough) adjustment for elevation. Right now just ensure two things. If one does have a set screw - it needs to be the bottom ring that goes on the back of the rifle, near the butt, and not the bottom ring more towards the front of the rifle. The second item is to ensure it is screwed inward or outward so as not be in the way of this first installation. If it is screwed to come out the bottom end instead of the top end, that could stop you from being able to attach the bottom ring to the rifle - until you screw the set screw to ensure it is out of your wary. The first item, of ensuring that the set screw bottom ring is in back, is because it is also an adjustment that we might use to tilt the scope downward later - that would in turn cause you to raise the rifle barrel to see through. Now this may seem confusing at first until you think about it. But you usually need to raise the rifle higher than being even since gravity will make pellets or bullets drop due to gravity. Therefore rifles usually end up being pointed more up. To an extent as far as elevation goes, the scope and the rifle are opposite. If you point the scope somewhat downward, it will cause you to somewhat raise the rifle barrel like it will need to be. For that reason, the bottom ring with the set screw (if you have a set screw in either bottom ring) must go into the back ring. Now getting the bottom rings attached to the rifle (remember again, the scope and top rings are NOT on to keep them safe) may take some practice. Loosen the hex screws that would attach the lower part of the rings to the rifle. Then position them roughly where you want them. Where do you want them? Well, one person said the scope should be as far forward as possible. But also remember it should be comfortable and fast also to look through and also the spacing needs to be that the normal part of the scope cylinder fits in the rings - and NOT the delicate front or back lens area. Okay, of course best idea is to get the scope lower set screws to bite under the lip of that rifle attachment area - which takes a bit of patience if you never did it before. It is easier the second time I thought. So then roughly line up both bottom rings where you think you want them. Notice on my rifle above, that the forward ring is as far forward on the rifle adjustment area as it would go - as the person requested to keep it far forward. But also verify before tightening that if you have a ring lower bracket with a set screw that it is towards the back of the rifle, that your hex screws securely are grabbing the lower part of that rifle scope attach bump, and that the scope will fit in there well with its cylinder area in the center and not the lens areas on the ends. Then when all that looks right, you can finish attaching the bottom ring. Do it a little tight, but careful if your rifle is plastic not to go too far. ATTACHING THE SCOPE At this point what you should have are the bottom rings attached. Before attaching the scope, if you do have a set screw in the rear bottom ring, you might want to try and give it a rough starting point. I find that with set screws, a little goes a long way. Since my job is to annoy and discourage rabbits from eating our grass (but I do not kill them) I am aiming for about 25 or 35 yards away. I find at that distance, the set screw in back of the rifle in the middle of the bottom ring only needed to be out the very slightest - a 64th of an inch or so? Not sure. But not much. Okay, now you are ready to install the scope. First look through it to ensure that you will have the correct portion for your eye and the correct portion in front. It should look like a bulls eye and a natural view. Okay, then you are going to put the scope on, and attach the upper rings over it with the hex screws or whatever fastener the scope company gave you. BUT THIS TIME BE CAREFUL! The scope is delicate, so you only want it to be tight enough to be secure, but not tight enough to break it. So I tighten the scope just enough to keep it from moving, but not much more. Best to be safe and gentle than sorry. And of course, what direction? Well generally I think the elevation adjust knob would face up, and the windage knob faces to the right of the gun - when the gun faces forward. (see the illustration) Then you are done with the assembly - for now anyway. WHAT IS A GOOD SCOPE? If you have an air rifle, you likely are not looking for a great scope that will cost more than the rifle did. Some companies such as Gamo, Tasco, and Centerpoint (Walmart brand?) make low end scopes. If you are rich then maybe you want a name brand like Nikon or Bushnell - but those were out of my price range. So, what is good? Look for the scope numbers. Something like 4x32 is great, perhaps something like 3-9x40 is even better. What does that mean? The first number is the magnification. In the first example, 4x32, 4 is the magnification. It is decent in my opinion. If the first number is a range instead of a number, such as the second example of 3-9, then that means you can adjust the power of magnification from 3 to 9. After the x, the next number is the opening in the front of the rifle that lets light in. Something like a 30, 32, or 40 are large and let a lot of light in so you can see the target clearly. For example a 4x9 scope and 4x32 scope will both magnify your image by a factor of four and both will likely have cross hairs. But then one with 32 will let in much more light than the 4x9 which will be darker and harder to see. I settled for 4x32 Gamo brand. It was inexpensive, and yes I am aware it is not a Nikon, but I think it suits my air rifle well, and the 32 lets in a lot of light and I can see quite clearly with it. WHY DO SCOPE ADJUSTMENTS ANYWAY? If this section is too technical for you and you just want to know how to adjust it, just shoot on to the adjustment section. But I figure that you might want to know why you are adjusting a scope. Why don't they just work? Well, the answer is that while you are shooting the pellet or bullet forward, earth's gravity is pulling it downward. So then if you shot level, and did no adjustment, likely you will always hit lower on the target (if you hit it at all) then if you tried to compensate. So then, what scopes try and do is to try and compensate for gravity by getting you to tilt your rifle up slightly, such then when the pellet falls at the distance you wish, it will end up right in the middle of the bull's-eye that you just aimed with. Let me try that again. You can only adjust for a certain distance - choose one that is good for you - 25 yards? 50 yards? 200 yard? or another value. Your bullet will fall so much before getting there. So what you do is adjust your scope to look somewhat downward. That may seem odd at first. But if your scope looks a little downward, then you are forced to raise the rifle barrel higher than the target to see through the bullseye, and then you will have arranged that what you see of the bullseye, is exactly what you will hit. But again, this only works for a single range - that you think you will mostly be shooting in. If you adjust for one range but shoot a shorter or longer distance, you might have to correct just by your eyesight. If closer, you might need to aim a little below the target. If further away, a bit higher than it. But if you aim at the distance you adjusted for, then the bullseye should be about right. How much does a pellet or bullet fall over a range? Well, this is somewhat theory only since of course you are going to aim high to cancel it out and adjust your scope that way. And it can get complex since wind resistance is also a factor. But basically a rough view is just to look at the equation for gravity itself, which is: d = - (1/2) * g * (t2) Where t2 means the time in seconds squared, and g is gravity, about 32.2 feet per second. or: d = -16.1 times (t times t) where t is in seconds. Huh? You ask? Well, let me show you an example, and this is only approximate and no you do not need to understand this all to adjust your gun. This is just for the curious. In my case, my gun claims to shoot pellets 800 feet per second. But that is likely with 10 air pumps and on a clear day that never happens. So I am going to say maybe 6oo feet per second. I am going to guess that my rabbits I am trying to scare away (and no PETA, honest, I never killed one) are about one fifth that distance of 600 feet. That means the pellet should get there in about 0.2 seconds. To me, that seems fast. I do not move that quick. So then the equation becomes: d = -16.1 times (0.2) times (0.2) or -16.1 feet times 0.04, or 0.64 feet or about 7 and a half inches So in my case the pellet will drop about 7 and a half inches during my rabbit shooting. While that is interesting, it does not matter since we will adjust it out anyway. But this might help your curiosity at least approximating what is going on. So, you could say that I then should shoot 7 and a half inches higher than my target. No. I will adjust the scope such that it does that for me and I don't have to think so hard and get headaches. ADJUSTING YOUR SCOPE If you have a set screw in the back of your ring when you installed the scope remember that it is your "course" or "rough" adjustment. So that adjustment has to be close for you to be able to adjust with your normal scope elevation adjustment knob. Of course maybe the expensive Nikons don't care about set screws and are so great, one adjustment does it. I do not know. What I will say is that if you have a set screw in the middle (looking down) of your rear bottom ring, you must take it into account even if you decide to screw it down and out of the way - you must make a decision. As I say, for me at about 25 yards or 35 yards, I have it out just very slightly - maybe out one 64th of an inch or so. Certainly less than one eighth of an inch. Okay, now get a target or make your own - and of course ensure that you obey all laws and ALL safety precautions. Daisy seems to say that if you are making a target yourself, put many magazines (not newspapers) in the back to catch the pellets safely. But I will leave the laws and safety up to you that you must ensure you are safe and legal while doing this next part. But at least do this for safety - ensure you are safe from possible ricochets - by distance or other means. Safety first. Me shooting 35 yards away was pretty safe from ricochets, especially since I wear eye protection. LARGE ADJUSTMENTS ON THE SCOPE I do need to say that my photo above can be misleading - unless you know more of course. What I call the fine adjustments - the arrows pointing to elevation and to windage? They do point to the adjustment - but the adjustment is NOT the black knob that you see above. Those are only caps that cover the real adjustment. So if your scope also hides its fine adjustments under caps, you should of course temporarily take the caps off to get easy access to the real adjustments under them for this next part. In my case, the adjustments under them were easy to turn with my fingers and did not change things too much for the first adjustments I made. In my case, I used a simple cardboard box which I filled the way Daisy suggested and then put an 8.5 x 11 inch paper target taped to the front that had circles like a bulls eye on it. I also had a pair of binoculars handy, so I put it out about 30 yards. Then be careful and aim and shoot at the target using the bulls eye on the scope. Now be safe. If you do not hit the paper and you think your are better than that, you either need a larger target (at least for scope adjustment) or you need to find a way to try and shoot safely above or below the target until you hit the paper. But also, think like a detective. One time I was shooting I saw I did not hit the paper but that the paper was dirty - and I figured correctly that I must be hitting the dirt in front of the target. And of course, if you have to aim below it, then your scope is getting you to raise the rifle too much. Remember that the scope and rifle are opposite, so if the rifle is aiming too high, the scope must be angled upwards just a little - which will then cause you to lower the rifle. If you have to shoot over the target to hit the paper, that means you need to raise the rifle, which will mean pointing the scope downwards a little. Whew! Even while writing this I find I am confusing myself. Well, I hope no mistakes there, but also try and be logical and figure it out yourself. Remember that the scope and rifle somewhat act opposite. If you point the scope more downward, it will cause you to raise the rifle higher and shoot higher. If you point the scope more upwards, then that will cause you when looking through it to point the rifle lower. The hard part I found was getting past the course adjustment of the set screw. I found a little went a long way - and I had to lower the set screw a bit. After a bit when you get close, now at least for the cheaper scopes, now you can use the fine adjustment knob that might come with your scope and should be on the rifle top. When you are done with the adjustments and are hitting the paper where you wish, then you are ready for the fine adjustments on the target. FINE ADJUSTMENTS |
||||||||||||||||||||||||||||||||||||
 |
||||||||||||||||||||||||||||||||||||
|
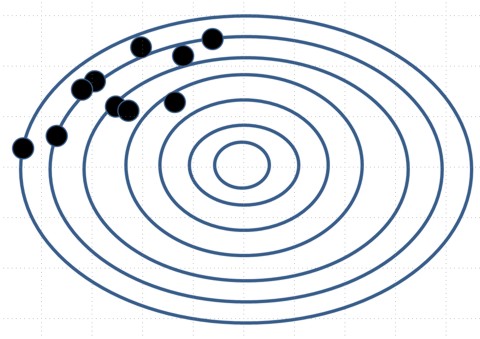
This picture above I simulated to show what I got after the course adjustment and just the first few fine adjustments with elevation after removing the cap and reading the scope instructions. Clearly it is too high and to the left. Even with this, if I were rabbit hunting (scaring them off) I would know how to aim - and that answer would be down a bit and to the right of the target. But of course I will continue adjusting the scope. Note that it needs both elevation adjust downward and windage adjustment to the right. Personally I was not surprised it needed an elevation adjust - since that is for whatever distance you wish, but I was surprised it needed a windage adjustment. There was no wind that I could feel. But perhaps a lot, like small issues on scope mounting can cause either item to be off a bit. But this I thought was a good start. After a bit I was finding that at 30 yards, at least hitting the 8 and a half by 11 target paper I made was consistent. At least I was no longer missing the paper entirely. Yep. Hopefully tomorrow I will adjust this in where I need it using the two scope fine adjustments. DAY TWO OF ADJUSTMENTS Trying to get closer, I found that at 30 yards even the minor "course" adjustment I did with the set screw had to go. So I took the scope off (just the scope and top, not the bottom brackets) and screwed the set screw down where it could no longer lift the scope in back. I knew this would affect the fine settings, but one must move forward. Putting it back together, the pattern was now in the lower right instead of the upper left as before and shown above. But at least now it was adjustable. I find that on the Gamo scope that "Up" for elevation is what you want it to be - moving the rifle up (not the scope) so you can hit higher on the target. Good. As for horizontal windage, it was the opposite of what we might want. Counter clockwise would shoot more to the right, and clockwise would shoot more to the left. One would like it to be as you move the top to the right it would go to the right, but no such luck. Okay, I just had to remember it was opposite. Well, the good news, was that ALL shots, and I do mean all shots, at least hit the 8 and half by 11 paper at 30 yards - and so they also told me where the current pattern was. At this point I am within 2 inches of the center. FINALLY After much effort, it paid off and both my adjustments of the scope and my aim got better. When it did come together, I was quite impressed that at 35 yards, if I concentrated, the pellets hit close to center. One thing I also had to do. Someone more experienced than me told me to squeeze the trigger gently, so gently that I should be surprised when it goes off. Yeah. When I did that after carefully aiming, things went well. if i jerked the trigger, I could see the rifle move. Nothing like good advice to help. Well, my opinion at this point is that if you do not start an expert, but stick with it, you might be impressed with the results as I am now- at least at 35 yards. Want more? Our latest "Convert" series of 9 calculators now contains a hunting calculator that can give an approximation of how much a pellet or bullet drops over a distance - which might be a great help on scope adjustment, since scopes must compensate. Convert Program that now includes a Hunting Screen Hope This helps! |
||||||||||||||||||||||||||||||||||||
|
|
||||||||||||||||||||||||||||||||||||
|