|
Touching Up your
Digital Photos
new: added hints and
tips for Corel Photo Paint 8 and similar programs
new: Problems
using Corel Photo Paint 8 and Windows XP Operating Systems
Forward
This section is a free section giving advice on touching
up your digital photos. In some cases we will show pictures, and
in some cases not. In many cases, the pictures may not actually
add much to the discussion, and would just slow down the page loading.
In this section are techniques used by the webmaster of this site on the site
photos and on home photos.
The photo program used for touch-up here in the
discussion is Corel Photo Paint 8. At this time, this program is
actually somewhat dated with a Photo Paint 10 version out, but that just
means that its techniques should work with newer software and likely
with other brands of software also.
Please remember to always save your work and original
photos before working on them. Since many of us consider photo touch-up an art form, there is never a guarantee that the touch-up work will
be better than the original. Of course as one learns more, they
also might learn to do an even better job and may wish to begin with the
original photo again.
Lightness / Darkness /
Rotating
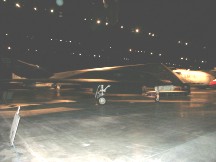
One of the simplest and most common problems with
digital photos is that they are either too dark or too light. If
so, save the original, and then load the photo into your photo touch up
program. In this case you want of course the lightness control.
However it is best if the lightness control also allows you to change
contrast and possibly intensity at the same time. There is no
secret formula to all of this. Just change the lightness /
darkness adjust and watch the image. Note that if you do have a
contrast adjust, that you might find yourself several times going
between the lightness (or intensity) adjust and the contrast.
Adjust both lightness and contrast to suit and then save the changed
photo. Don't be too surprised if the photo does not end up being
perfect; if a photo starts out much too light or much too dark, like the
one above.
And yes, rotating. If your original photo was shot
holding the camera to one side, then the photo will of course be
sideways when displayed. Many photo-paint programs will allow
rotation - such as 90% clockwise or 90% counterclockwise. I find
it best to just rotate all of the sideways shots as soon as possible -
to make for easy viewing later.
Internet Photo Albums
If you have taken digital pictures and have decided you
wish to put them on the internet, most likely the pictures will have to
be modified before you do that. Original digital camera photos are
often too large in size and in bytes of storage to do well on an
internet web page. Both must be modified. For an example of this
size problem, photos taken with my olympus camera tend to be larger than
this page, and also about 650,000 bytes. In looking at what it
needs to be, a good internet size is perhaps 4 or 5 inches wide and then
20,000 bytes or less.
There are two issues here with the size of bytes you wish
to use for your internet photos. The more bytes you use for a
photo on the internet, the better the picture. So you may say that
you wish to use all 650,000. But when considering how long it
takes the page with the photo to load, you definitely do not want the
photos over 20,000. In fact if you want very fast load, you even
want the picture memory byte size even smaller. So, you have a
tradeoff coming. But let's take one thing a time to see how much
needs to be done.
| First decide how wide you wish the photos on your
internet page. Somewhere in the range or 3 to 6 inches wide is
probably best, but of course it is your page, so you get to decide
that. In my case, I often put pictures up on the net that are
5 inches wide. When you decide on the size and have the photo
loaded in your program, look for a "resize" control. Then adjust the
control for using inches (and not pixels) if you can, and adjust the
width for 5 inches if that was your decision. Before you tell
the program to execute, see if the program "resize" control has
an aspect ratio control box on it. |

|
You wish to keep the aspect ratio the same. That
means as the width decreases, the height will also decrease such that
people look normal after the resizing. If your resize control does
not give that convenience, you will have to ratio the length change to
the same amount of change in the width. This will take work.
But basically, if you are cutting the width in half, then the length
needs to be cut in half also.
After resizing the photo, take a look and see if you
wish to modify the darkness, lightness or contrast of it. If so,
this would be the time to make those changes. Then save
the image - likely in ".jpg" format if you are going to post it on a
website. If your ".jpg" save program asks for the percentage of
compression and smoothing, that also takes some trial and error.
Basically the more compression, the less detail the photo will have but
also the smaller the file size will be. So once again, we are
trading detail for file size. I tend to use compression of 10% and
smoothing of 10% if asked. When saved, reload your final work and
see if you are okay with the detail that you still see. Also check
your stored file to see how large it is - ensuring that it at least is
less than 20,000 bytes - or even smaller for fast loading. If
either of these issues - details or file size does not match your
objectives, you may need to redo some of the above. It may take
some practice to reach the right compromise for your desires.
Re-sizing Photos for
Printed Documents
In the above example, we talked about re-sizing photos
for internet usage. In that case file size is very important since
the larger the file size, the longer the web page will take to load.
Sometimes you may also need to re-size photos for putting on a page and
printing. In this case, file size is much less important. To
be sure, the larger the picture size in bytes, the longer the page will
take to load on a computer - but that issue is generally much less
sensitive.
If you are shrinking a photo to fit on a page for
printing, you may wish to decide if you want better clarity. When
you are using your photo-paint software for resize - again ensure that
you pick the option (if there is one) of keeping aspect ratio the same -
to ensure that width and length decrease at the same rate.
However, look to see if they also allow you to modify "dpi" or dots per
inch. If so, you have the choice of keeping much of the detail even if
shrinking. Often pictures may be 72 dpi - or 72 dots per inch.
If shrinking the picture, say to half its width, you might want to
consider better clarity by changing 72 dpi to 200 or so. Many
printers nowadays can handle 200 or even 300 dpi - so the higher dpi
will give you a sharper image. Of course, making the dpi number
larger than the original photo can support will not buy you much.
In general, one can double the dpi for every time that we shrink the
width in half. But of course, this is not an exact science.
The file size of the photo of course will not shrink as much as it did
in the internet example - since you are keeping much of the clarity.
Again, some practice at this might help.
Sectioning a Photo and Cameos
If you are shrinking a photo anyway, you might want to
consider if you would rather just have a section of it instead.
For example, let us say that you took a photo of four family members,
but that they ended up small in the center of the photo and your
relatives are too small and your background too large. Consider
just using a smaller section of the photo around your relatives and just
a little of the background.
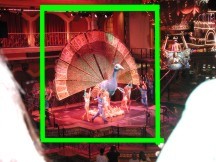
| Example - on the photo on the right - since there
were obstructions anyway, plus the photo would need to be reduced
also, one might consider masking the area shown in green and then
using that as the photo to save. How to do this? A number of
photo programs have a "mask" that can be in various shapes - but
most often in a rectangle shape. |
 |
It might allow you to mask an area of the photo that you
truly would rather have. Then you can "copy" that area and then
you can "paste to a new document" if it allows that. If your
software allows you to do all of that, then you have the real photo that
you wish. If this photo is now the wrong size, you can then look
for your software programs "resize" control and then just follow some of
the advice in the above "re-size" paragraphs.
Note that for some photo-paint programs if you cut an
area out or do large modifications, that you might need to save the item
using "export" rather than "save as". This depends on the program.
NEXT PAGE - Blemishes and Repairs
Comments?
note: use the following link to also send comments to us
regarding this page. Note that comments may be linked to from that
page.
To rpsoft 2000 software |