|
Bargains from the Sponsor: |
(software programs for the Windows PC Computer)
Music
music chords guitar /piano made easy !
Blackjack
Super Blackjack Game with the Latest Hint Charts ! Also does Spanish 21 and more!
Software Utilities
Email Address Program that puts you in Control !
Metric / English Conversion Calculator and more!
Webmaster
site crawler
program, check
reciprocal links
and more
Modify file names and attributes, even many at once!
Store www addresses, password names and passwords conveniently !
|
Fill Patterns ("Tiles") Fill tools - they can save incredible amounts of time and do a great job. Of course, like the other tools in Photo Paint 8, they can take some practice. Fill tools exist for solid colors, blends, and also for patterns - called "tiles". One can also make their own tiles or patterns for fills. That takes some practice also. Using Fill for a Solid Color Before using a fill, you should be aware that fill's require certain things set up for them to work the best. The first is the setting for the fill. This setting is under "view/rollups/tool settings" when the fill tool is selected. For normal solid fills, my settings are set to: transparency = 0, anti-aliasing is checked, and the settings are also set to "normal" and 14. These settings are likely not optimum, but they may get you started. Next you need to know that fills watch the colors on the picture to know when to stop filling. If you already have a picture on the area that you are working on, and you do not wish it overrun with the new color, you may have to fix its borders with a color that the fill stop at. Of course black outlines work most of the time, but you may find that you can be less extreme than that to get the job done. How to do the fill? Select the fill symbol
The Solid Fill Itself Then simply put the fill tool on the area you wish to fill and press the left mouse button and watch. If you are lucky, the fill color will go exactly where you wish. If not, you may have to adjust some of the outlines of your picture to prevent the fill color from getting through a wall. Note that it does not take much of a break for a fill color to get through a wall. In extreme cases, I have found that if your current image is too complex and has new shapes copied onto it or other complexities, that a picture may have to be saved as a cohesive picture as a bitmap ".bmp" or similar and reloaded in order for it to have real boundaries to stop the fill where it should. If you have done all of this and still have fill problems, try adjusting the settings a bit. Pattern fill is not very different, but has a whole different appeal. To use it, one would select the very same fill tool. But in this case, one needs to select a pattern image from settings at "view/rollups/tool settings". In my case, the image at the top to click on for patterns is the third from the left, and is called "bitmap fill". When you have selected bitmap fill, next one needs to load a desired pattern. Click on "Edit" on the tool settings. On the new window that opens, select "Load" to load a selected pattern. Note that under the folder "tiles" that there are a number of interesting fill "folders", such as "wood", "stone", "foliage" and more. And yes, "stone" includes bricks, and "foliage" includes grass. Select a desired folder and then pick a "tile" pattern inside of it. After your pattern is "loaded", then click "okay" on the load window. Then the fill pattern is ready for usage. Try it on a picture. It will work similarly to the solid color fill, but of course in this case, will do a pattern instead. Note that back on the load window (that is found in settings after pressing "Edit") that one can adjust the size of the fill pattern also. To do that, just uncheck the "use original size" box and change the sizes to suit - as much as they allow at least. Have fun! Its a great option. The hard part on getting a pattern for a fill is to ensure that you have a pattern that will repeat and not be odd around certain edges. Of course a very simple pattern can be done that we can ensure will repeat. Let us create a fill pattern that is just a checkerboard pattern of white and black. To do that, we only need a very small area to work with. Begin with a "new" (create an image) image of only 2 pixels wide by 2 pixels long. That is all we need. Start with the new image being white. Then simply make two of the outer squares black. To work on an image this small, you might need to magnify the image to 1600 times. Note also, that it is sometimes hard to get one pixel totally white or another pixel totally black. You can try to target them exactly. Another way is to just target the portion of a pixel that is away from another that you are trying not to change. If you click on a pixel from a safe direction a few times, it will still darken as needed with likely less influence to the adjacent pixel. The magnified image should now look like below (when magnified 1600 times):
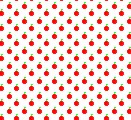
...where the gray area is of course background and not part of the image. Then just save this resultant picture in the "tiles" folder in an inner folder of your choice. You can always make a new folder within tiles if you wish. Pick a name of your choice for this pattern. To use this pattern, simply pick the fill tool, select "bitmap" type of fill in the settings, and then select "Edit" as before. On the new window, select "Load" and then load the test tile from the folder where it was placed. Try it out. I did while doing this example, and it worked fine. Making a More Complex Tile Pattern Again, the problem in making your own tile patterns, is ensuring that the patterns can repeat without obvious lines where the pattern re-occurs. So, some planning is needed for the size of how many pixels wide and how many pixels long the pattern is to be. Let us make a more complex pattern, this time with a repeating apple. Of course, it need not be an apple that repeats, but this will show a means of doing it. Let us show the steps.
2. Then create a new object - totally white in our case, and then copy your image and paste it to that new area. Of course, one needs to pick the size of the new object well. In this case, we will pick an area 15 pixels by 15 pixels. 3. Then duplicate the object by right clicking on it and choosing "duplicate".
5. Center them by going to: object/arrange/align and distribute .. To document center. When you do this, the two images again should be in the center, and one on top of the other. 6. Use your mouse to select just one of the objects and
combine with background:
8. Then you can resize the end image if you wish. Then save it in a folder of your choice under "tiles" in the photo paint 8 program area. Then the image is ready to use.
Summary Fun, huh? Yes the power of these new paint programs such as Corel Photo Paint 8 are really amazing. As much as we currently know about the programs capabilities, we are still very aware that there is still even more power inside of it. However, we truly hope that these discussions will help you in either your business or fun side of life.
Go to Digital Photo Hints Start Go to Free Section Info Summary Comments? note: use the following link to also send comments to us regarding this page. Note that comments may be linked to from that page.
|