|
Bargains from the Sponsor: |
(software programs for the Windows PC Computer)
Music
music chords guitar /piano made easy !
Blackjack
Super Blackjack Game with the Latest Hint Charts ! Also does Spanish 21 and more!
Software Utilities
Email Address Program that puts you in Control !
Metric / English Conversion Calculator and more!
Webmaster
site crawler
program, check
reciprocal links
and more
Modify file names and attributes, even many at once!
Store www addresses, password names and passwords conveniently !
(software programs for the Windows PC Computer)
Music
music chords guitar /piano made easy !
Blackjack
Super Blackjack Game with the Latest Hint Charts ! Also does Spanish 21 and more!
Software Utilities
Email Address Program that puts you in Control !
Metric / English Conversion Calculator and more!
Webmaster
site crawler
program, check
reciprocal links
and more
|
REMOVING AND FIXING
new: added hints and tips for Corel Photo Paint 8 and similar programs
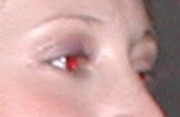
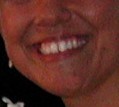
I find that if the persons eyes are small relative to the overall size of the photo, that you can vastly improve red eye by simply painting over the red portion of the eyes. To do this, first of all save the photo in a safe place with a different name just in case your artistry does not meet your approval when done. Touching up is an art after all and may take some practice. Before attempting touching the eyes up, I would first of all see if your photo-paint program allows you to zoom in on an area? If so, I would recommend working on tiny areas at approximately the 600% size zoom. But adjust to suit. It is just much easier to work on a blown up version of the item you are trying to fix. While many of us speak of blue eyes, and brown eyes, and green eyes, I have not seen many digital cameras that show that detail clearly - at least at a distance. It seems to me that when a digital camera is working right that the peoples eye pupils are dark (mostly); when there is a problem, the pupils are red. Well, I tend to simply use a dark shade such as dark gray and color over the red parts. I would first of all suggest adjusting the brush size to the right amount you need before beginning to allow you sufficient detail. Note also that sometimes "red eye" even escapes beyond the pupil area and overshadows even the eyelids and more. If that is the case, you might need to reconstruct just a tiny portion of the eyelids or eyebrows also. When done painting over the red, look at the pupils and see if they are all dark now. If they are, you might consider adding just a dash of a lighter color - even white - near the center of each pupil. Since eyes reflect, this whiteness will often look like a normal slight reflection. When complete with that, view your final work at normal 100% size and see if you like it. If not you might try again a little touch up at 600%. If you like the work, then of course, save the result. If not, you can always go back to the original photo which hopefully you have saved before starting. If there is a blemish in the photo, you might be able to repair it. The last blemish I fixed was a bright reflection off a lady's chin, tooth and nose at a wedding. While just a reflection, it seemed to detract from her and the picture. Now a bright reflection may start out as complex bright light. However, on a photo, it is just a white color where you wish a different color to be.
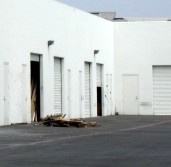
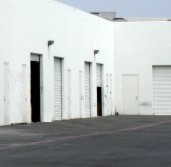
Use the eyedropper to pick up skin tone as near the blemish as possible and in as average a color as possible to match. Then size the paint brush to the right size for the task and just paint over the blemish - or reflection in this case. You may find you have more touchup to do - using smoothing tools or the paint brush. Fix as needed. When done, again look at your photo at 100% size and see if you like your work. If not, consider zooming in again at 600% and trying again. If you wish a more subtle change than repainting the blemish away - such as a partial coverup, see if your photo paint program has an air brush. An air brush often can be adjusted to spray a color partially over an area - sort of like makeup does on a real face. The result then can be a combination of the original blemish plus a partial cover -something more subtle and perhaps even more realistic. If you like your work, then save it. If not you can always go back to the original photo. Removing Items, (Making Items Disappear) This is really similar to the last item "blemishes" except for size. If a problem in a photo is small, then by zooming in on that area, and using your paint brush and similar tools, you might be able to fix it. But what about larger areas? Once I was asked to make a tv antenna on a house go away. Another time, I was asked to make computer cords go away. Of course one cannot simply erase the items, since the photo has no memory of what was originally behind the item. One can make large items disappear if they are on a "reasonable" background - a background that is somewhat easy to work with. A sky with clouds, perhaps a carpet or grass, things like that may make it possible.
(and not a new document). You should then be able to move the "new" background copy and place it over the item to disappear. Once you have done that you may have to save the redone photo in order to complete the patching process. If you have to do that, save it under "temp.bmp" or something similar just in case you are not happy with the end results. (note that saving intermediate work as a ".bmp" format will provide the most detail). Re-open the photo and now the item that you wished to disappear is now covered by the new background. Zoom into the area where the new background meets other areas of the photo. Use you paint tool and smoothing tools to blend this area in better. When done, see if you like your work on making the item disappear. If not, of course you can try again, or revert back to the original photo. An alternate means for copying backgrounds over may be provided by some photo-paint programs. Corel 8 does have a wonderful tool called "clone". What it does is target two areas on the screen. One is a cross hair that one must set first, and that will be the area (either on that photograph - or even another picture) to copy FROM. Then the other item is a brush. That brush when used transfers whatever is at the crosshairs to the new area; plus the brush and the crosshairs move in the same directions at the same rate as you brush. In this case, one can copy a background to cover up an item more easily and in almost any form instead of rectangular only. Of course even with this wonderful tool, when background is now applied over the item to disappear, it is still time to zoom in and do repairs at the edges with a paint brush or smoothing tools. For the above picture "making garbage disappear" - the clone tool was used. The clone tool was used to transfer pavement over the garbage, then some of the white building over the garbage, then some of corrugated door over the garbage, as well as blackening the doorway. Admitingly, the clone tool is even more powerful than copying and moving masks. We had talked above of using a "re-size" adjust to make pictures smaller for the internet or printing. We also suggested that one should always ensure that if there is an aspect ratio control on that "resizing" control that one use it. The aspect ratio ensures that the height and the width remain always to the right proportions. Of course, if one wished to be devilish, they could modify a picture with the aspect ratio control off. Then if one makes the width decrease faster than the height, people will be thinner. If one makes the height decrease faster than the width, then the people will seem fatter. Of course, beyond a certain amount of change, people will see that the photo had been tampered with. I do tend to almost always keep the aspect ratio the same for photos I work with, but suit yourself. Fun is in the eyes of the beholder. Comments? note: use the following link to also send comments to us regarding this page. Note that comments may be linked to from that page.
|